Supply and demand zones introduction ‑ page 3 The 4 market stages: Inside the order flow
Page 1: What do you mean supply and demand
Page 2: Institutions vs retail: Wyckoff still works
Page 3: The 4 market stages: Inside the order flow
Institutions create the big moves, right?
Wrong. This is a myth. It is mostly the opposite.
The traditional role of retail traders in financial markets is to be lemmings that move price with their headless buying or selling after institutions have completed their accumulation or distribution.
Kicking off this headless buying or selling is the institution's final trick in an accumulation or distribution campaign: In the case of accumulation, they typically drive price below the bottom of the range to attract the last remaining opportunistic sellers, and then create a convincing breakout to the upside. This shakes out those — now disaffected — sellers and gives the green light for eager retail traders to start pushing their buy buttons. Buy quickly now, before you miss it!
After that kick-off, retail is expected to take on the job of moving price to a higher range, with the institution occasionally stepping in to hold a hand under price and keep it going in case the move should slow down. That's how "buy the dip" became such a popular retail strategy.
Of course the opposite is true after a distribution campaign.
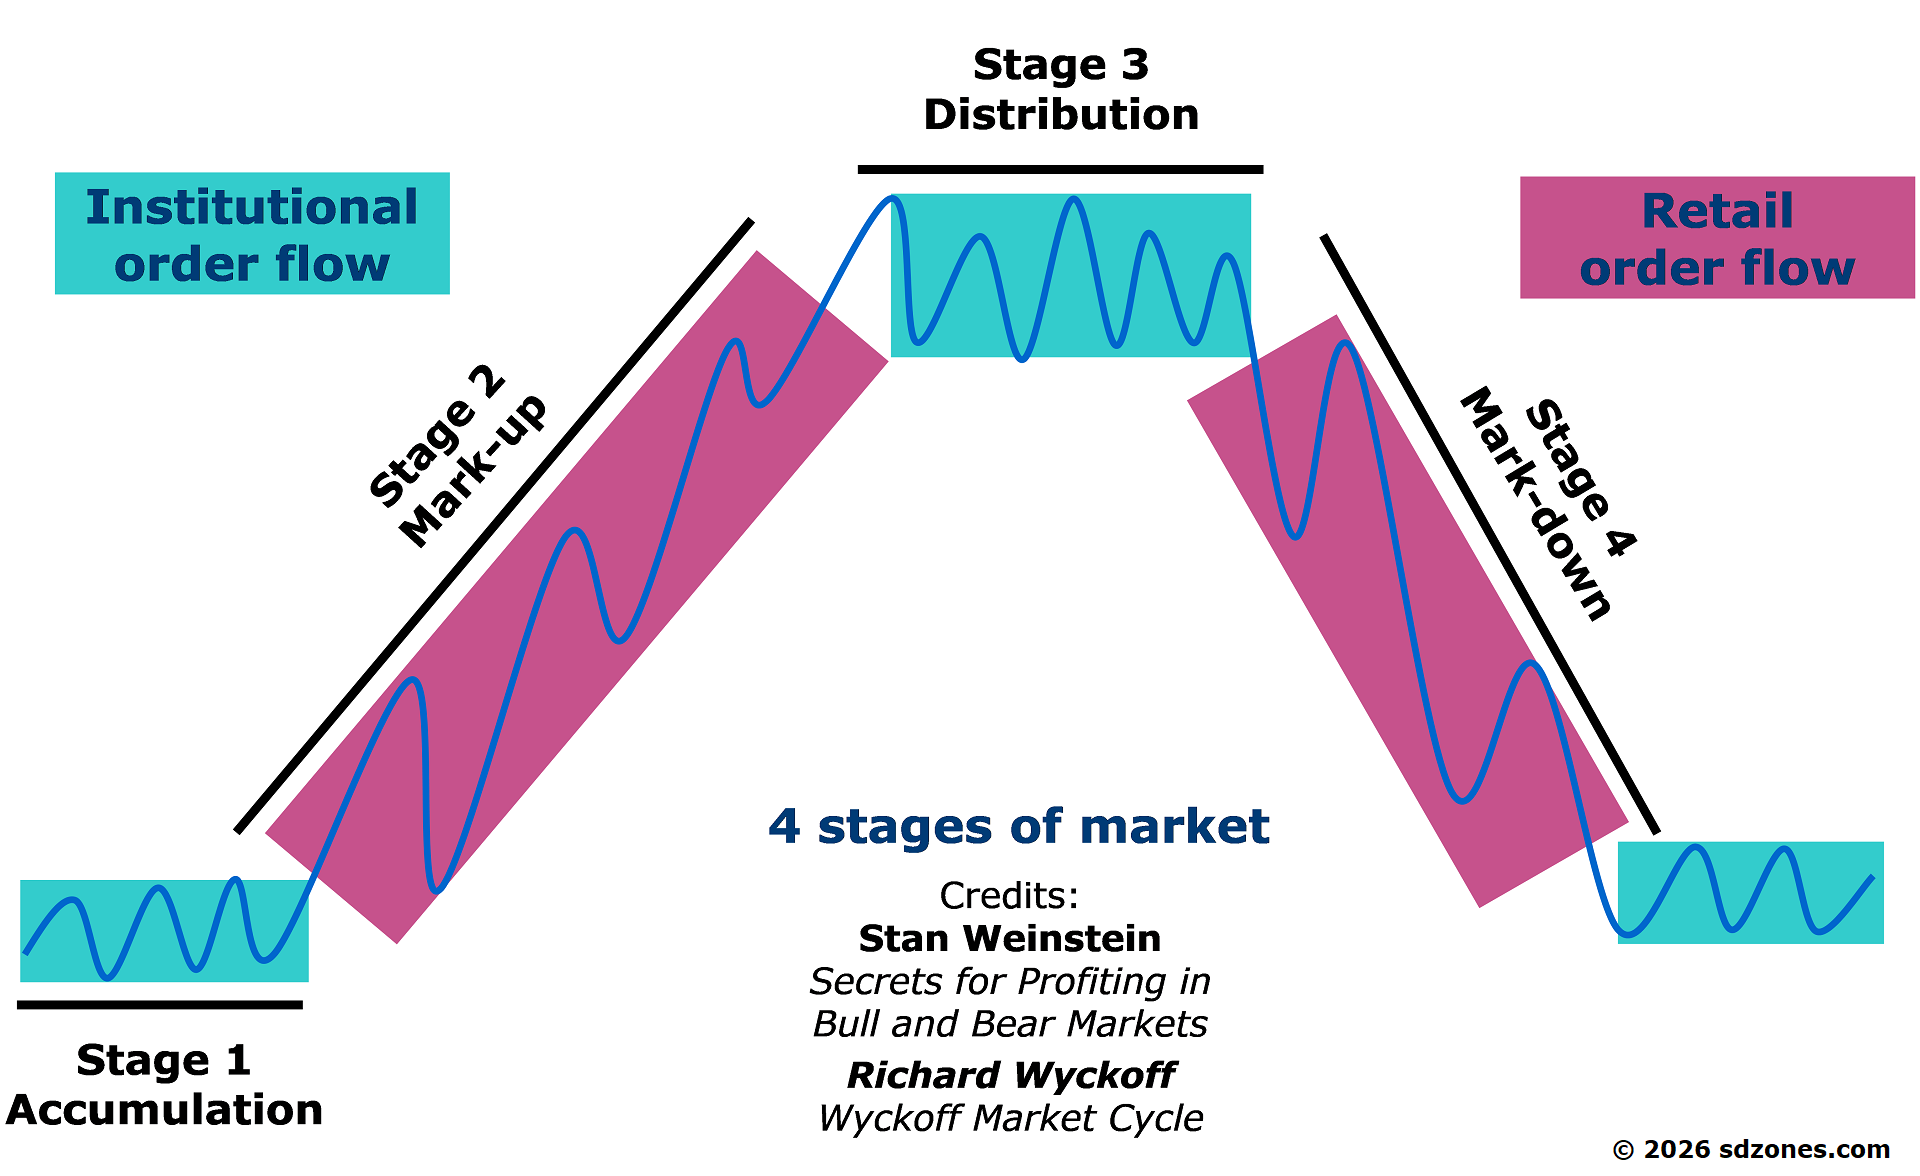
Wyckoff described this phenomenon too, dubbed the Wyckoff Market Cycle: markets continuously go through stages of Accumulation, Markup, Distribution and Markdown. Other famous analysts have since described these four stages as well — often without crediting Wyckoff.
Markets continuously oscillate between stages of Accumulation and Distribution during which price more or less stays in a range. These stages are dominated by Institutional order flow. In between them, stages of Markup and Markdown move price to higher or lower ranges, respectively. These stages are dominated by Retail order flow. This alone should tell traders much about how they should and shouldn't trade.
Obviously, this graphic is stylistic and doesn't reflect how markets usually keep moving through multiple cycles of larger markup stages and smaller markdown stages (in uptrends) or vice versa (in downtrends). This is particularly true in stock markets, which have an innate upwards bias, often for long periods of time.
But the principle of market stages cuts to the core of what troubles many traders, supply/demand traders as well as others: if you are on the wrong side of the prevailing direction (trend, if you will), you are likely to have smaller and fewer winners — and that's at best — no matter how great you are at finding entries. Even great zones can fail in the wrong direction, and even mediocre zones can work in the right direction. The importance of this cannot be overstated.
Supply/demand methodology happens to address that dilemma too: properly applied to High Timeframe charts, it is one of the most reliable ways to predict trend, as we'll discuss on the next page.
Institutions do make use of market orders anytime they deliberately want to move price: during an accumulation campaign they want to keep price in their designated accumulation range, or even below it. But if they run out of sellers to take the other side, price will jump above the range.
To push it back down, they sell small quantities on a series of market orders, essentially sacrificing some of the position they had previously accumulated, knowing that this will move price lower. These are still profitable trades, so not much of a sacrifice; they just add time to the total accumulation campaign. But what's important is it allows them to subsequently continue accumulation at a lower price.
Again, the opposite is true during a distribution campaign.
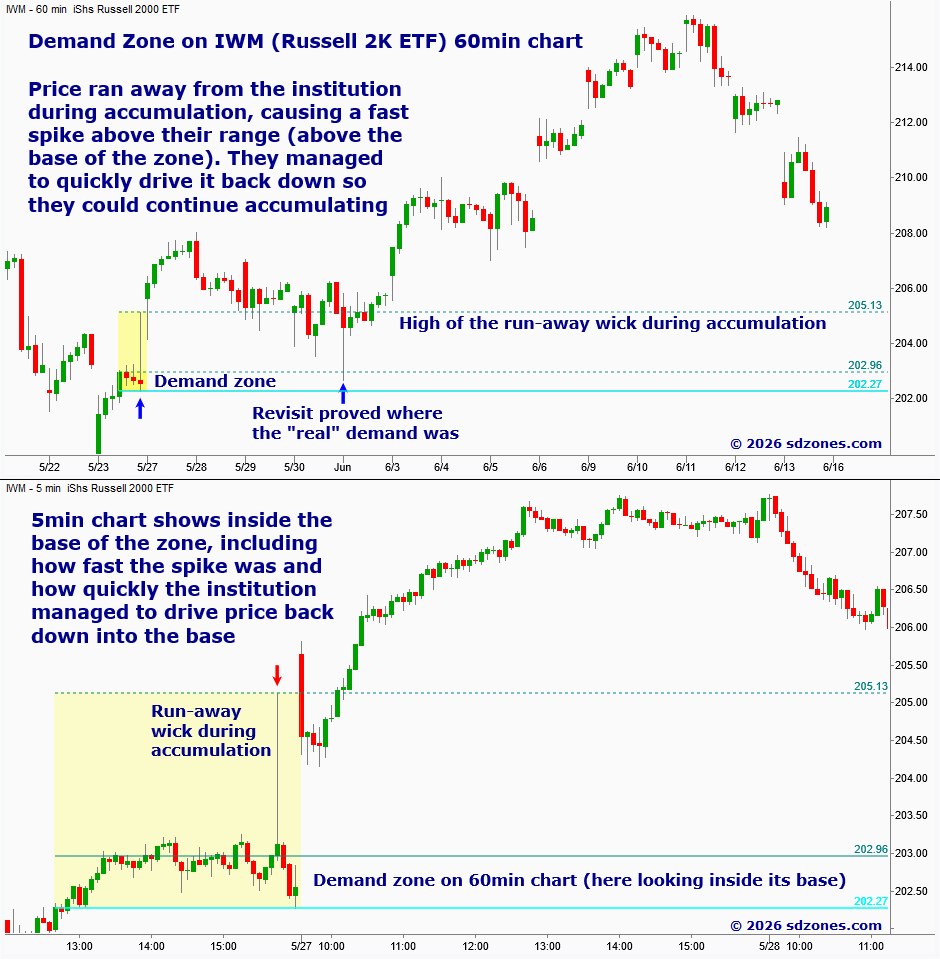
During accumulation in this demand zone (top chart), the institution temporarily ran out of sellers willing to take the other side, thus causing an unintended spike in price as shown by the tall wick above the base of the zone. They quickly drove price back down inside the base by selling small quantities on aggressive market orders. The smaller timeframe chart (bottom) shows the inside structure of the demand zone during its formation, revealing how fast that spike occurred and how quickly it was dealt with.
Hence, the answer to the question above is 1 (one): Just a single share (or contract) is all it takes to move price to the other side of the bid/ask spread when traded on a market order. That is true even in high volume markets.
To experienced traders, who already know to avoid market orders when possible, this mostly belongs in the "interesting fact" department. Except this: when jumping on a fast train to join a momentum move (which can be a good trade given the right setup) be aware that it is usually a pure retail move and rarely sustained by institutions.
Volume analysis confirms this: The highest volume is usually just before and after a momentum move, rarely in the middle of it.
To those who may be skeptical whether "price manipulation is real" consider this: If the biggest problem for institutions is to fill their orders without moving price, how hard do you think it is for them to deliberately move price when they want to?
Institutional traders who come across this article already know this and most likely already take advantage of it.
We warned this was about to get nerdy, but fascinating, right? Or maybe only to nerds. The question is how do you trade it?