Supply and demand zones introduction ‑ page 2 Institutions vs retail: Wyckoff still works
Page 1: What do you mean supply and demand
Page 2: Institutions vs retail: Wyckoff still works
Page 3: The 4 market stages: Inside the order flow
The problem with size
Different from most retail traders, the primary concern for institutional market participants — pension funds, hedge funds, investment banks, ETFs — is not simply direction, but size: They deal in volumes so massive that they cannot be filled instantly without moving price against their own interests. They need to keep price low while buying and keep it high while selling. Doing that isn't trivial.
To buy or sell a large position, institutions employ various "tricks" to keep price in an acceptable range for an extended period while they conduct accumulation or distribution campaigns — buying or selling, respectively. They use sufficiently small orders to stay unnoticed and avoid moving price; and even smaller orders to drive price back within the acceptable range whenever it runs away from them. This can go on for a long time depending on the size of the position being accumulated or distributed.
Many such tricks go into these accumulation and distribution campaigns, both to keep price within the range and to convince enough traders to take the other side: the campaigner needs to "manufacture sellers" when accumulating and "manufacture buyers" when distributing. These tricks include some that are not strictly legal, but hardly ever caught by regulators. No names mentioned here, but famous revelations have surfaced from time to time.
Technical analysis titan Richard Wyckoff described these tactics by what he called Smart Money operators a century ago (that's how old that moniker is). As the owner of a brokerage, he was dismayed to see retail traders getting fleeced by these campaigns, and he set out to teach them how to trade with the Smart Money instead of against it.
Wyckoff described this in great detail in magazines and books during the 1920s and 1930s, including how to identify accumulation and distribution zones — so-called Wyckoff ranges — and how to trade them.
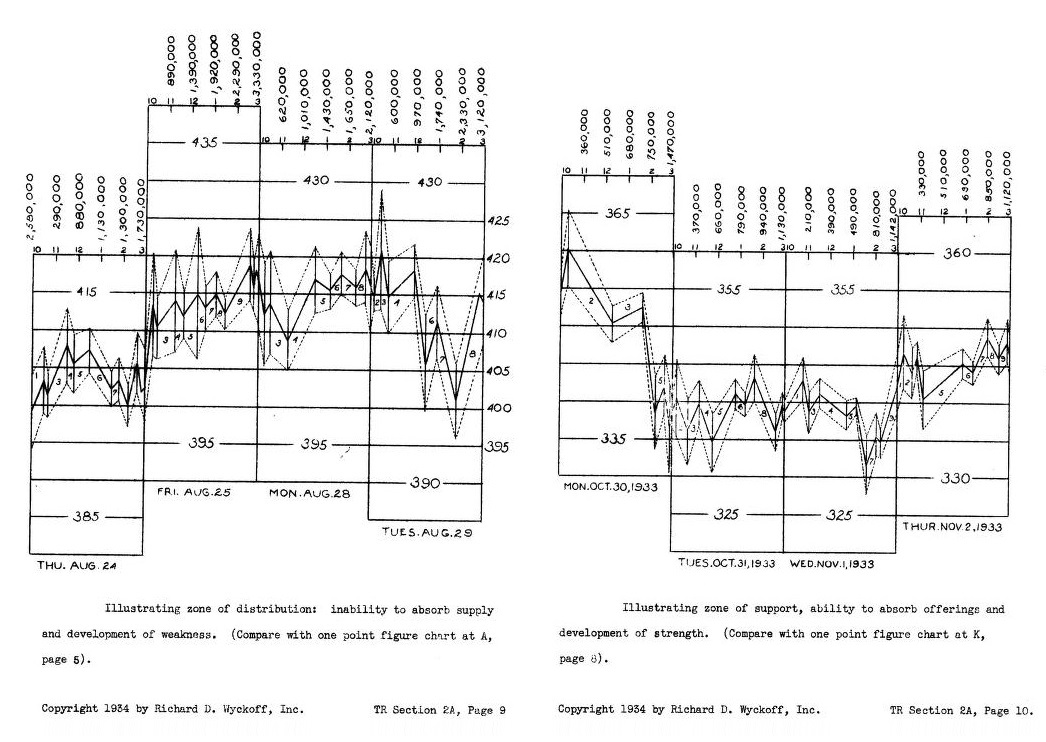
Distribution and accumulation zones from Wyckoff's 1934 book "The Richard D. Wyckoff Method of Trading in Stocks". Supply/demand traders don't need to know the detailed activity within zones described by Wyckoff, but the basics of how and why they form are useful background when determining the quality of zones.
Incredibly, these zones have continued working ever since, even as computers have taken over more roles in trading, and as other popular "wonder trades" have come and gone.
The reason they've continued working is simple: there is almost no way to buy or sell a significant position without employing these accumulation or distribution tricks. Even smaller institutions such as family offices, prop shops and small funds use them because they have to.
And so, these "footprints" of institutional activity remain one of the most reliable forms of technical analysis for traders who know how to spot them. And how to trade them.
So, supply/demand zones are the same as Wyckoff ranges?
Well, yes. And no. Sort of.
There are significant differences, both in how they are identified and how they are traded. But the accumulation and distribution activity which forms Wyckoff ranges is also what forms demand and supply zones. And the campaign tricks are mostly the same.
When compared to the supply/demand zones shown on the previous page, the observant reader will notice that they certainly look very different: Wyckoff ranges show an extended period of detailed trading activity whereas supply/demand zones are usually just one or a few bars. There are very specific reasons for that.
Wyckoff identified and broke down the detailed activities of Smart Money operators during their accumulation and distribution campaigns so that he could predict when the campaign was complete and join the breakout from the zone as it occurred.
Supply/demand traders don't do this. They wait and let the breakout occur without trying to join it. They only look to trade when price pulls back and revisits the zone. Call it a re-test of the breakout. Their assumption is that the Smart Money operator will add to their position, which very often they do: either because they were not able to trade all the volume they desired before price ran away from them — an unintended breakout when they ran out of suckers to take the other side; or simply because they want to defend their position.
Because of this, supply/demand traders have the advantage of receiving the most important clue about a zone before trading it, namely its breakout. They don't have to debate whether the range is accumulation or distribution, or even a zone at all, because the direction and strength of the breakout tells them. And thus they don't have to monitor the details inside the zone as it forms in order to predict its breakout.
Of course the downside is supply/demand traders may miss a trade because price doesn't pull back to revisit the zone, at least not right away. You can't have it both ways.
By not trying to trade a zone the exact moment it breaks out, supply/demand traders can take advantage of it long after it has formed, assuming they know how to properly qualify it as a trend or countertrend trade. We cover this in the SD Zones training videos.
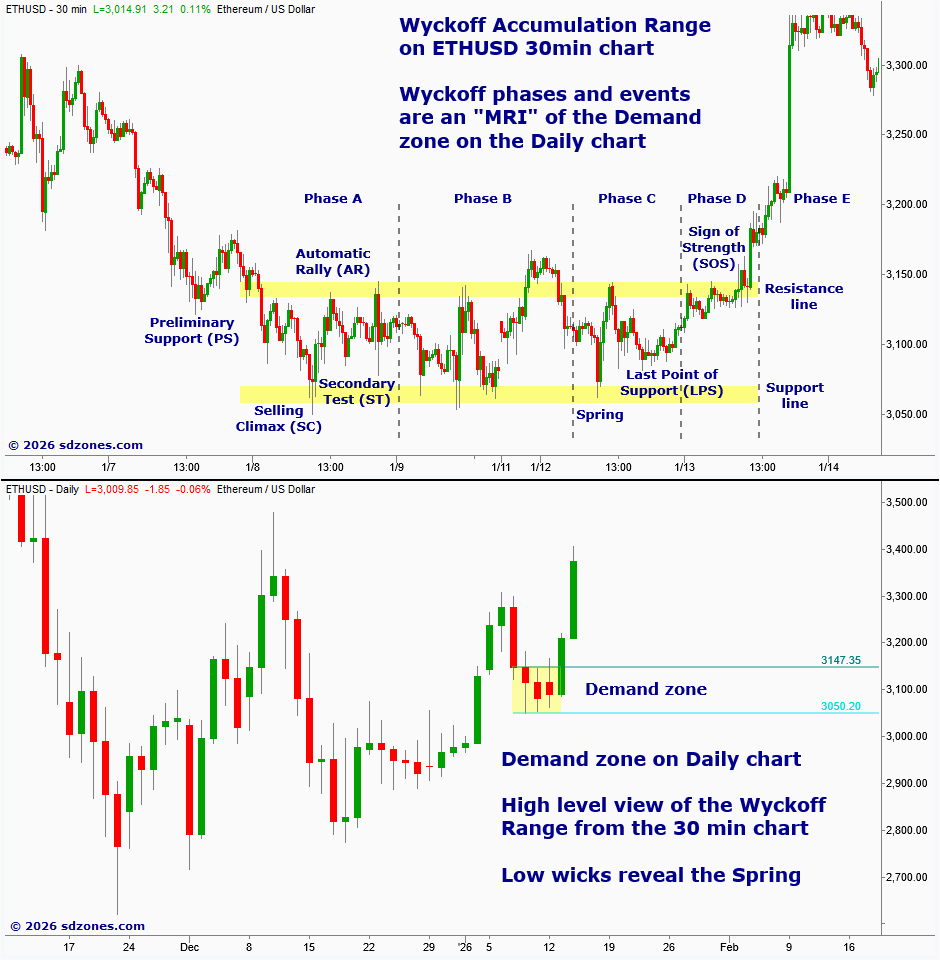
The visual difference between Wyckoff ranges and supply/demand zones is mostly a matter of timeframe, or scale: the Wyckoff range is like a detailed "MRI" (say, on a 30 min chart) showing the inside of a supply/demand zone consisting of only a few bars (say, on a daily chart).
Think of the Wyckoff Schematic of this accumulation range (top chart) as a detailed "MRI" of a demand zone on a larger timeframe (bottom chart). We use this structural insight to identify quality zones — filtering out those with poor internal characteristics that are more likely to fail, even if they look valid on the surface. When using SD Zones, the trader doesn't have to know anything about Wyckoff to take advantage of all this.
There are other differences too, particularly due to the fact that Wyckoff traders primarily trade the breakout while supply/demand traders trade the revisit, which means the ideal Wyckoff range isn't always an ideal supply/demand zone, and vice versa. The analogy between them only goes so far. But supply/demand zones represent the same hidden order pockets as Wyckoff ranges, and both styles of traders seek to "ride the elephants".
In earlier times, the order pockets within zones were often active limit orders waiting to fill, which only a few market insiders had access to see. These days, they are mostly intended orders, waiting to be sent when price approaches the zone. For this reason, you can ignore suggestions about using Level 2 and market depth to find supply/demand zones. Those days are long gone.
Knowing how to identify zones is important, but recognizing the larger market context is even more important.